McLean IT Consulting

WORRY FREE IT SUPPORT

Call Us: 250-412-5050
  • About
  • Services
    • IT Infrastructure Design
    • Remote & Onsite IT Support
    • Disaster Recovery
    • IT System Monitoring
    • IT Audit
    • Documentation
    • Medical IT Solutions
    • Wireless Networks
    • Cloud Computing
    • Virtualization
  • Partners
    • Lenovo
    • Ubiquiti Networks
    • Dragon Medical Practice Edition (Nuance)
    • Synology
    • Drobo
    • Adobe
    • Bitdefender
    • NAKIVO
  • Contact
  • Blog
  • Remote Support

Synology – See Files Locked by SMB Users

April 18, 2016 By Andrew McLean 5 Comments

Synology DS1815+

I’m amazed this never came up for me before, but I recently had to diagnose a weird issue where we were seeing shared files locked, preventing other users from accessing them. Thankfully it turned out to be unrelated to the Synology, but I did discover a useful command in the process.

As usual, these advanced commands require that you SSH into the command line interface of the Synology box. You may login as root if using DSM 5.2, or as an admin user/sudo if using DSM 6.0. For the purposes of this blog post I’ll assume DSM 6.0.

So first you remote into the box:
[code lang=”bash”]ssh admin@[synology_IP][/code]

Then run the command “smbstatus” as root via sudo:
[code lang=”bash”]sudo smbstatus[/code]

You’ll be prompted for a password, then it’ll display the output.

First you’ll see a list of client sessions, followed by a list of locked files, similar to the screenshot below.

output of smbstatus
smbstatus output clearly showing files locked

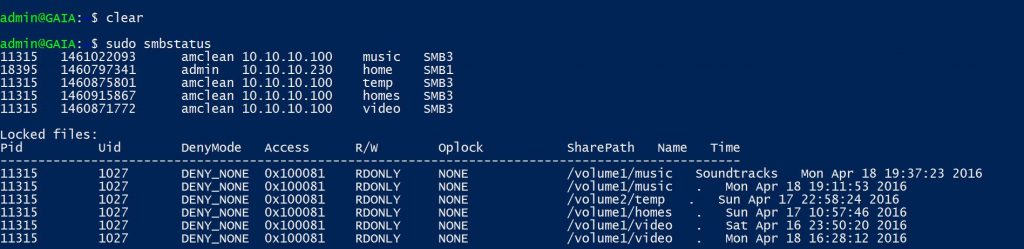
Now the output itself has a few parts as identified by the header. The PID is the process controlling the session or locking the file. The UID is the user that this process is running as. The numbers aren’t very descriptive, but you can reverse search those numbers to get relevant information.

To get the Process Name from UID:
[code lang=”bash”]ps -p 11315-o comm=[/code]

PS is one of the most basic commands in Linux operating systems. In this case we’re using PS to query the PID (as specified by -p [UID]) and then telling it what output format we want (using -o) – in this case “comm” which is the name of the command. Clear as mud? Good. In this example it reveals nothing interesting because we already know the process that has locked these files is the SMB process. The output shows smbd

We can also assume that the UID is the user that is currently accessing or locking the file, but especially in a busy network, it can be useful to identify precisely which user is accessing and/or locking a file. And for this we use a slightly more clunky command to reverse-search the UID.

[code lang=”bash”]awk -v val=1027 -F ":" ‘$3==val{print $1}’ /etc/passwd[/code]

Now AWK is a pattern-matching tool that I couldn’t even begin to explain in this post, but suffice it to say the rest of the command is there to feed it a pattern to match (in this example 1027), find the matching UID row and output the third column value (that is, the name) of the user, all of which is found in the file /etc/passwd. Or put in simpler terms, it looks inside /etc/passwd for the username matching the UID.

Filed Under: Tips

A Case for Split-Brain DNS

March 16, 2016 By Andrew McLean Leave a Comment

brain hemispheres
Split-Brain DNS

I recently tried to explain the concept of Split-Brain DNS to a colleague, with little success. Unless you are heavily involved in the infrastructure side of IT, the nuances of DNS can be daunting to the uninitiated.

Split-Brain DNS, also known as “Split-Horizon DNS” attempts to solve a problem that arises when any kind of network resource must be accessed from both inside and outside of a network.

For example, let’s say an IP-based video surveillance system has been set up at your workplace. All cameras feed into a device called an NVR, or Network Video Recorder. One feature of devices like this is that you can access the video feed from a computer or a mobile device like a tablet or phone. Just like any network resource like server or printer, to reach the NVR to view the video feed, you must know the address of the NVR. For the purposes of this example, we’ll say that the device address is 192.168.0.50. This is where the problem starts: this address will only work while inside the network. As soon as you leave the premises, no longer connected wired or wirelessly to the internal network, you can no longer reach the NVR by that address, not just because of the firewall, but also because the addresses in the 192.168.0.* network can’t be reached directly from the public internet space.

What many will do, then, is configure multiple profiles: one for internal use, another for outside. But what if you wanted to access the NVR with a single friendly server name, from both inside and outside the network?

Although this involves a little more on the infrastructure side, I’m a strong believer in making things simpler for users and clients. In my experience, a lot of confusion can arise from not being able to access this kind of information from a single profile.

So to understand split brain DNS, I need to delve a little into what Domain Name System (DNS) is and how it works.

DNS is basically a system that correlates an easy to remember name with a not easy to remember IP address. When you type in ” www.google.ca”, a bunch of things happen behind the scenes: your computer asks another computer where www.google.ca is, and eventually in a matter of a few thousandths of a second, the public address of that server is returned. You the user never see what that IP address is unless you know how to look for it, because everything happens invisibly and is handled by your browser and computer. See also my earlier post What is DNS?.

In this example, Google maintains a “DNS zone”, which is basically just a list of servers and server names that are publicly addressable.

Most businesses will have a website, which means that they will have a DNS zone for that domain. To properly configure split brain DNS, all one needs is a domain name, and an internal DNS server.

I will use my own website as an example. My website at www.mcleanit.ca is hosted on a Web server in California. In my DNS zone (mcleanit.ca) there is a server named “WWW”, whose value is the IP address of my Web server. When you look up www.mcleanit.ca, this is where it finds the real IP address and returns it to your computer. But I could have other servers. I might have a billing.mcleanit.ca, or mail.mcleanit.ca.

To continue the earlier example of the video surveillance system, I could make a DNS record called “surveillance” and point it at my (ideally static) public address of my place of business. From there, I would have to open up the relevant ports in the firewall and redirect them to the NVR. This would allow me to access the NVR remotely while outside of the network using surveillance.mcleanit.ca.

Here is where Split-Brain DNS comes in. A private local network can have its own DNS server. Often it is used in larger networks when servers and other network resources need to be addressed by name easily. Maybe an internal tracking system or private intranet website.

On the local DNS server, I could create another DNS zone for mcleanit.ca identical to the first, except for resources that exist on the local network, which I would instead correlate to the internal address. Then I would configure the DHCP server to assign the internal DNS server as the primary DNS provider. So while the real, public DNS record for surveillance.mcleanit.ca would point at my public address, the internal DNS record would override that with the local address for all internal computers (all those configured by DHCP, at least). Attempts to reach surveillance.mcleanit.ca from either inside or outside of the local network will now reach the same destination: the NVR.

Split Brain DNS

The downside is that now both DNS zones will have to be maintained. Changes to the public DNS zone will have to be duplicated on the private one when appropriate.

Implementing a DNS server doesn’t need a big expensive server though. A perfect use-case scenario even for home users is to make a Synology NAS available both inside and outside a network. And even the single-drive units themselves support Synology’s DNS app for an easy-to-use interface.

Filed Under: Technology

Synology — How to Check RAID Rebuild Progress

May 21, 2015 By Andrew McLean 3 Comments

Synology DS1815+
Synology DS1815+

So you’re minding your own business, when out of nowhere you get a text from your Synology NAS has experienced a drive failure. Your heart skips a beat but you remember that the drive is still under warranty, and you silently pat yourself on the back for having the foresight to implement the notification service, and for setting up dual-disk redundancy RAID so that even if a second drive were to fail, you could still recover all your data.

You submit the hard drive warranty claim (making sure to choose the “advanced replacement” option where they send you the new drive before you return the defective one) and pretty soon you have the brand new replacement drive to install.

Out comes the old drive, in goes the new, and you tell the Synology to repair the degraded RAID array. Before long, the Storage Manager shows you an indicator that slowly crawls up from 0.0%.

...but what does that mean in hours?
…but what does that mean in hours?

A percentage indicator is great! But it doesn’t mean much without context. It would be nice for the RAID rebuild progress indicator to give you an ETA, so you can start breathing again.

Oddly enough, the system is already estimating how long it will take, but for some reason the number is hidden, and of course is only revealed by a command line session through SSH.

Unlike some other command line tricks for Synology NAS devices, this one does not require logging in as root, however it does require a user who actually has SSH access, in other words an admin user. Once you’re logged in it’s quite simple.

[code lang=”bash”]cat /proc/mdstat[/code]

It will then output something like this:

Synology mdadm rebuild progress via SSH
Hint: it’s the one that is rebuilding.

Yours may not look the same depending on how you structured your drives. Each volume is identified by an MD (Multiple Device) which is just a linux term meaning it can be an aggregate of many drives. You may see more MD designations rebuilding simultaneously. In this case MD2 is rebuilding, and shows that it will finish in just over 980 minutes — roughly 16 hours. So you can go for a walk. Or stream some videos because your Synology can rebuild itself without interrupting its other duties.

Filed Under: Tips

What is DHCP?

May 10, 2015 By Andrew McLean Leave a Comment

On any network, as with the Internet, every device needs an address in order to send or receive communication. DHCP is a system that makes this process easier.

DHCP stands for Dynamic Host Configuration Protocol. When configured, it automatically assigns, for a limited time, an address to any (or any approved) network device that asks for one. DHCP commonly operates from the Gateway Router in consumer-grade equipment, but in this post we’ll treat the DHCP server as an abstract service instead of a specific device.

How does DHCP work?

DHCP operates in four stages between the DHCP Server and the DHCP Client. The first stage happens when a client device (when configured to use DHCP) is connected to the network be it a wired interface, or a wireless one.
DHCP process

First, the client broadcasts a DHCPDiscover message. Broadcast, in the context of networks, means that it sends this special message to every device on the network. This special message contains special hardware-identifying information so that the server will know who to respond to – since, of course, the client does not yet have an IP address to reply to.

All available DHCP servers will respond to this message with a DHCPOffer. This message will include an assigned address, the address “lease” time, and some other relevant information. The first DHCPOffer to be received by the client “wins”.

The client then replies to all DHCP servers with a DHCPRequest message, which notifies them which server “won” and formally accepts the offer. This allows the other DHCP servers to return their offers to the pool of available addresses to await the next request.

The final message comes from the winning DHCP server, in one of the following two forms:

  • DHCPAck, which acknowledges the address and may sometimes include more network configuration information to finalize the process
  • DHCPNAck, (DHCP Not Acknowledged) which indicates that the address offered is no longer available or the client computer has moved

The “lease” time is the period of time before the address needs to be renewed. At the end of the lease, if the computer is no longer connected to the network, like for example if you had a temporary houseguest connect to your network, the address lease simply expires and goes back into the pool of addresses ready to be reassigned. In places with high-client-turnover such as a convention centre, a hotel, or a café, the lease time may be shortened to as little as a few minutes to ensure addresses are recycled efficiently and/or a larger pool of addresses may be configured – the common consumer-grade wireless router will usually come preconfigured with a pool of 254 addresses.

What would life be like without DHCP?

If the DHCP server were to fail, or otherwise be unavailable, computers are designed to fall back to a self-addressing protocol, called APIPA or Automatic Private IP Addressing. APIPA self-configures a computer with an address somewhere between 169.254.0.1 and 169.254.255.254. If those numbers seem odd or arbitrary, they’re just a range of 65534 addresses (a number reached thanks to some binary math voodoo), and have been reserved specifically for the purposes of APIPA.

What this means is if you were to connect two computers to a switch but no DHCP server, they could still technically communicate with one another, but with some limitations. You could never rely on a network printer or server when using APIPA because it would be prone to change (since nothing is there to manage the assignment). DHCP provides additional information like the Internet Gateway address, which tells clients through what device one can access the internet – without it, you would have to configure the gateway manually, and that would assume you know precisely what that address was. When you connect a wireless network, DHCP configures your computer for that network automatically and without any further intervention.

Without DHCP, you would have to manually configure each address on each device on each network you connect to. Even if you’re familiar with the concepts and process, this would be prohibitive in enterprise environments when there are possibly hundreds, or even hundreds of thousands of network devices. DHCP allows us to “plug and play”, or in the case of wireless, connect without any further configuration.

Filed Under: Technology

Homelab Introduction: Part 2 — Network Infrastructure

May 5, 2015 By Andrew McLean Leave a Comment

Network Anatomy

When people think of networks, most will think of the wireless router they use at home. But in fact, the typical residential or even small business router is many separate systems combined into one unit.

Gateway

The first function is as a gateway router. A gateway router routes traffic between different networks — for example between Internet or Wide Area Network (WAN) and your Local Area Network (LAN). A gateway router itself is already two separate functions: a gateway and a router. That is a complicated subject in itself that I’ll save for another time, but the bottom line is that its primary function connects your internal network to the internet.

Switch

The second core function of residential routers is as a network switch. Whereas a router passes traffic between different networks, switches pass traffic between devices inside the network. The difference isn’t apparent so much in residential networks besides the fact that a Switch enables more devices to be plugged in at a time. For enterprise environments, the differences and capabilities become much more pronounced. Again, the key point is that it connects your internal devices to each other.

Access Point

A wireless Access Point (AP) behaves much the same way as a Switch does, but utilizes microwave frequencies to transmit information to and from devices on the LAN. The caveat is that they are very prone to interference and stability issues. It can take a lot of effort to optimize a wireless network to mitigate these issues while maximizing stability, coverage, and throughput. Fortunately, this is something we specialize in. So think of it as a Network Switch with antennae for wireless.

More

What else do household gateway routers do? Most will include a kind of firewall, which can block malicious or unwanted traffic (both incoming and outgoing); a limited-capacity DNS server; DHCP, which controls and assigns the list of available IP addresses to assign your internal devices; and more.

In a large-scale enterprise environment, each one of these would potentially be controlled by entirely different systems. It would be both unthinkable and impossible to service an entire network from a single device and all of these functions because of the scale involved and the technical limitations (barriers would be technical, mathematical, geographical and even the laws of physics).

Design Philosophy

The point of the above is that the limitation of most residential or even small-business-grade network equipment is the same age-old problem of all combination devices. By combining the disparate devices, it somehow loses the ability to perform any one of those jobs as well as it should. Worse, if any single function fails, the whole device must be serviced or replaced. The configuration software, too, is buggy, limited, and infested with security vulnerabilities. Manufacturers produce home routers to be cheap and disposable, putting minimal effort into weeding out bugs and addressing security flaws. The inadequacy of these devices is so infamous that it’s prompted some industrious programmers to develop “alternative” firmware such as Tomato Alternative Router Firmware and DD-WRT which can be installed on some compatible routers instead of the stock firmware.

Just say no to combination devices

The bottom line is that my ideal network design philosophy is one device, one purpose – at least as far as I can separate the functions logically.

Ubiquiti Edge Router ERLITE-3

Historically, my homelab relied on a sturdy Cisco 871W Wireless Integrated Services router, and it ran flawlessly for about eight years. At the time I bought it, it was the single most expensive piece of network equipment I’d ever owned (I think I paid about $900 for the then-$1200 device), but I had grown tired of the shoddy off-the-shelf garbage failing every six months so the investment paid for itself many times since, both from an educational perspective and an operations one.

The limitations of the Cisco had been showing for some time now, requiring a Java-based software controller if I didn’t want to deal with the Command-Line-Interface (CLI). As familiar as I am with it, I do like to have some visual feedback to fall back on. And as time went on, Java and browser versions marched on but the HTML/Flash/Java controller software remained the same, requiring a lot more effort on my part to keep it running.

Ubiquiti ERLITE-3 - So fast, I can't even afford the equipment I would need to find the speed limit.
Ubiquiti ERLITE-3 – So fast, I can’t even afford the equipment I would need to find the speed limit.

The final nail in the coffin came when I realized that the processor on the device was so underpowered that it could not even attain the speeds my ISP offered me — the bandwidth that I was paying for, but could not meet. It was peaking at about 60% of the purported capacity.

I had been a longtime admirer of Ubiquiti equipment, and had demonstrated their effectiveness and stability in many other client projects, so I decided it was well-suited for the role in my own network.

Based on tests that I’ve seen online, the LAN-to-WAN throughput is so ridiculously high that it outperforms most people’s testing capacity. That is to say, if Gigabit internet speeds ever become common in North America, this thing could handle it without breaking a sweat. And for comparison’s sake, the Cisco 871W was peaking at about 30 Mbps, meaning the ERLITE could theoretically outperform it by more than 30 times!

Ubiquiti ERLITE Web UI

Besides performance metrics, the Ubiquiti Edge Router drew me in because of the cost (which was about 8% the MSRP of the Cisco 871W in its heyday). So 8% the cost, 30x the performance. I suppose it’s not fair to compare it to a device so old, but the major point here is that it has way more capacity than I can throw at it, which in theory should last me another 8 years.

Even some Ubiquiti loyalists have voiced concerns that the Web interface of the EdgeOS is still missing some advanced options, but I do most of the configuration through the CLI anyway so it’s not really an issue. But the options that are available are easy to find and configure, I daresay, for a savvy home user.

Netgear GS724T

When shopping for a Network Switch, I had a list of requirements in mind.

  • It had to be Gigabit, (1024 Megabits per second, or a theoretical max of 125 Megabytes per second between devices).
  • It needed IEEE 802.3ad Dynamic Link Aggregation (LACP), which basically combines multiple ports and enables them to work together to increase bandwidth to compatible devices. In my case, my Synology DS1815+ had four ports that I wanted to combine together to enable a theoretical 4Gbps throughput (500 Megabytes per second between multiple hosts).
  • To enable advanced functions like LACP, it had to be a “Smart” or “Managed” switch, as opposed to an unmanaged switch which has no interface or higher functions whatsoever, and merely connects devices together (but at a much lower cost).

I had some other requirements but it would be beyond the scope of this post to explain the why and how.

Netgear GS724Tv4 Gigabit Smart Switch
She may not look like much, but she’s got it where it counts, kid.

Most of the requirements revolved around speed and management, which allows me to save to my Synology server as fast as I might with a locally-connected hard drive. It also allows me to play videos on virtually every device I have over the network without noticeable hiccups or buffering. Since this same network is also the backbone of my home, it’s important that our home use does not interfere with business use and vice versa.

My wife does a lot of photography, and she had the habit of storing all the files on her local hard drive because navigating them over the network was painfully slow. Folders were slow to open, and the thumbnails would remain blank for quite a long time whilst they loaded. Now, it’s still an uphill battle breaking her of the habit of storing locally, but the network experience is dramatically improved – thanks to both this switch and the Synology DS1815+.

The Netgear GS724Tv4 checked all the boxes, and the price was right. Purists might argue that I would be better served by a fully managed switch, but I’ll perhaps save that for a future upgrade.

Ubiquiti UAP-AC (802.11AC)

Where the ERLITE is a high-performance, low-cost router, Ubiquiti’s line of Unifi Access Points (AP) are likewise positioned. They’re designed for scalability, which means that instead of the configuration software being installed and accessible from the device itself, it’s installed separately (on a server, desktop, or a dedicated device). Once the device is configured, the software doesn’t have to run in the background, even if the device is reset. It will simply continue to operate as it was configured when it last received instructions from the controller.

Ubiquiti UAP-AC
I had heard mixed reviews of the UAP-AC. IEEE 802.11AC wireless AP enables up to 1300 Mbps to compatible clients, though it’s such a new wireless spec that I only have a couple of devices that support it. This is the once device in my homelab that I don’t own — it’s on loan from a strategic partner. So although I haven’t experienced any issues reported by some about the AC model, I can’t really comment on it because I haven’t been able to really utilize it fully.

Ubiquiti UAP-AC Dual-Band 802.11AC, capable of 1300 Mbps
Ubiquiti UAP-AC Dual-Band 802.11AC, capable of 1300 Mbps, and up to 200 concurrent client connections

The bottom line here is that it’s a Dual-Band AP so it operates both on 2.4 GHz and 5 GHz frequencies and I have fast, stable wireless throughout a two-floor, 3000 ft2 home not including a limited range outside.

Another important design strategy here is that wireless communications ideally should not be the core communications infrastructure, rather it should be supplemental to a wired network. Although wireless speeds can sound deceptively fast on paper, it is inherently a half-duplex medium — in other words, only one device can “talk” at a time, and only in one direction at a time, like a two-way radio. This is why high-bandwidth protocols like video streaming and torrents can choke even the fastest wireless network.

As ubiquitous (no pun intended) as wireless technology is, there really is no comparison to a wired network.

One thing that you may not have outright gleaned from all this is that the function, ability, and requirements of each device impacts the decision of each other device. This highlights somewhat the “design” aspect of a network. The goals I had for the Synology NAS required at least the advanced functions of a Smart Switch, and at Gigabit speed. That speed, in turn, required a minimum of Cat5e cable. The wireless AP had to be placed somewhere central, relatively free from obstruction, not against metal or tucked behind stone or concrete. In a well-designed network, each decision potentially affects another. And of course, above all else, it needs to be well documented.

To Be Continued…

So there you have it: my core network infrastructure. Stay tuned for part 3, Virtualization and Monitoring.

Filed Under: Homelab

  • « Previous Page
  • 1
  • 2
  • 3
  • 4
  • …
  • 12
  • Next Page »

Contact Us

McLean IT Consulting Inc.
Serving Greater Victoria

P: 250-412-5050
E: info@mcleanit.ca
C: 250-514-2639

Featured Article

iPhone Security Issue? Maybe…

If you've been watching the news recently, you may have heard a story regarding the fact that the iPhone stores logs on the phone and computer … Continue Reading

Blog Categories

Our Mission

We seek to enrich and improve small and medium businesses by delivering best-in-class technology solutions, and offering a premier customer service experience. Contact Us Now!

Quick Menu

  • About
  • Testimonials
  • Contact
  • Blog
  • Sitemap

Let’s Get Social

  • Email
  • Facebook
  • LinkedIn
  • Twitter
  • YouTube

Copyright © 2025