McLean IT Consulting

WORRY FREE IT SUPPORT

Call Us: 250-412-5050
  • About
  • Services
    • IT Infrastructure Design
    • Remote & Onsite IT Support
    • Disaster Recovery
    • IT System Monitoring
    • IT Audit
    • Documentation
    • Medical IT Solutions
    • Wireless Networks
    • Cloud Computing
    • Virtualization
  • Partners
    • Lenovo
    • Ubiquiti Networks
    • Dragon Medical Practice Edition (Nuance)
    • Synology
    • Drobo
    • Adobe
    • Bitdefender
    • NAKIVO
  • Contact
  • Blog
  • Remote Support

Synology — How to Check RAID Rebuild Progress

May 21, 2015 By Andrew McLean 3 Comments

Synology DS1815+
Synology DS1815+

So you’re minding your own business, when out of nowhere you get a text from your Synology NAS has experienced a drive failure. Your heart skips a beat but you remember that the drive is still under warranty, and you silently pat yourself on the back for having the foresight to implement the notification service, and for setting up dual-disk redundancy RAID so that even if a second drive were to fail, you could still recover all your data.

You submit the hard drive warranty claim (making sure to choose the “advanced replacement” option where they send you the new drive before you return the defective one) and pretty soon you have the brand new replacement drive to install.

Out comes the old drive, in goes the new, and you tell the Synology to repair the degraded RAID array. Before long, the Storage Manager shows you an indicator that slowly crawls up from 0.0%.

...but what does that mean in hours?
…but what does that mean in hours?

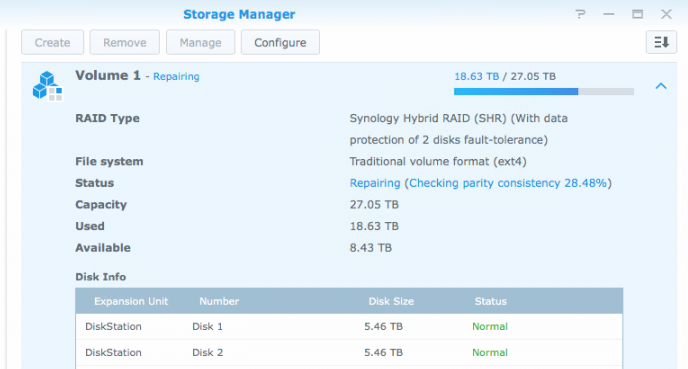
A percentage indicator is great! But it doesn’t mean much without context. It would be nice for the RAID rebuild progress indicator to give you an ETA, so you can start breathing again.

Oddly enough, the system is already estimating how long it will take, but for some reason the number is hidden, and of course is only revealed by a command line session through SSH.

Unlike some other command line tricks for Synology NAS devices, this one does not require logging in as root, however it does require a user who actually has SSH access, in other words an admin user. Once you’re logged in it’s quite simple.

[code lang=”bash”]cat /proc/mdstat[/code]

It will then output something like this:

Synology mdadm rebuild progress via SSH
Hint: it’s the one that is rebuilding.

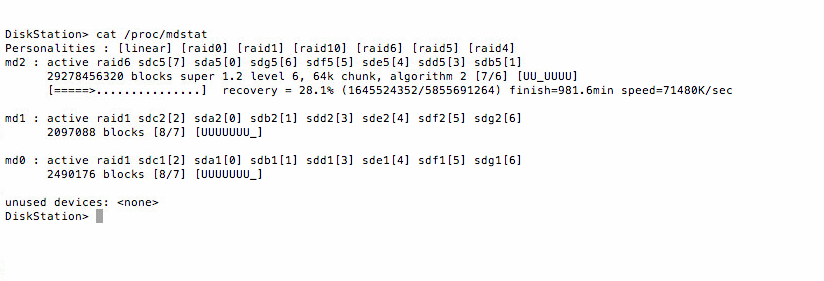
Yours may not look the same depending on how you structured your drives. Each volume is identified by an MD (Multiple Device) which is just a linux term meaning it can be an aggregate of many drives. You may see more MD designations rebuilding simultaneously. In this case MD2 is rebuilding, and shows that it will finish in just over 980 minutes — roughly 16 hours. So you can go for a walk. Or stream some videos because your Synology can rebuild itself without interrupting its other duties.

Filed Under: Tips

Synology – How To Check Thumbnail Conversion Progress

May 5, 2015 By Andrew McLean 22 Comments

synomkthumbd
By default, Synology NAS devices will index all media files (pictures, music, videos) and generate applicable thumbnails. When a new file is indexed, this kickstarts a process that asks the thumbnail generator to get to work generating various thumbnail sizes for a given file. A common complaint from Synology users is that they can’t tell if the thumbnail process is frozen. I myself was curious which exact file the conversion process was working on, so I found the means which I’ll explain here.

The background process that generates thumbnail images for Synology devices is the aptly named synomkthumbd, presumably for Synology Make Thumbnail Daemon. In Synology DiskStation Manager, this process is called Thumbnail Conversion.

Here I’ll detail how to connect to the Synology device via SSH to find out what files synomkthumbd is currently performing thumbnail conversion for.

Connecting Via SSH

This process assumes some familiarity with command-line tools like telnet. In Mac you merely need to open a terminal window, but in Windows you would have to third-party utility like PuTTY (because Microsoft’s Telnet solution does not support SSH protocol).

Update 08/2015: Windows 10 now includes SSH in PowerShell.

If, for whatever reason the Synology does not respond to the SSH request, make sure SSH is enabled by logging into the DiskStation Manager interface and navigating to Control Panel > Terminal & SNMP > Terminal.

You must be logged in as root or the final query will give you a “Permission Denied” error.
ssh root@[synology IP]

At this point it may say something about an RSA key fingerprint (particularly if this is the first time you’ve ever connected via SSH) and ask if you’re sure you want to continue connecting. Just say yes. By default, the root password should be the same as your admin account.

Find Thumbnail Conversion Process ID

Every computer process always has a unique process ID (PID) associated with it for reference. This number will usually be different each time this process is started, so we can’t assume what the number will be. First we query the system to find out the Process ID of synomkthumbd

pidof synomkthumbd

It will answer with the PID which will simply be a number.

List File Descriptors

Next we list the file descriptors that are being used by that process using the ls command

ls -l /proc/[pid]/fd

This should output a list of (what appears to be) workers that generate the thumbnails. On my box I see three folders called 0, 1, and 2, which I believe act to generate thumbnails for multiple files at a time. Note that PID number will change each time a new synomkthumbd creates a new process, so if you get a “no such file or directory” error in this step, go back to the previous step and see if the PID has changed.

If, for whatever reason, it appears that the thumbnail conversion process has frozen, it can be stopped and restarted without restarting the entire Synology NAS this way:

/usr/syno/etc/rc.d/S77synomkthumbd.sh stop
/usr/syno/etc/rc.d/S77synomkthumbd.sh start

The the same basic process is applicable to video thumbnail generation, except videos are generated by ffmpeg-thumb instead of synomkthumbd; there also appears to be folders 0 through 4 for that service.

Update: May 2015

It appears that the methods for starting and stopping the thumbnail conversion process that I described above are obsolete. (Thank you Peter). It previously worked as of DSM 5.1 but it was probably deprecated and since the 5.2 update they presumably got around to eliminating the old way.

Instead, Synology has added a central service management system, which you can call via SSH by running synoservicecfg.

If you feel the need to go down the rabbit hole, you can get a list of command arguments by running

synoservicecfg --help

Or you can simply get a list of services (which includes the synomkthumbd service) by using this command:

synoservicecfg --list

Armed with the name of the service you want to stop and start, the same synoservicecfg command can stop, start, or restart it.

synoservicecfg --stop synomkthumbd
synoservicecfg --start synomkthumbd
synoservicecfg --restart synomkthumbd

Filed Under: Tips

Synology – How To Check Index Progress

May 5, 2015 By Andrew McLean 43 Comments

DS1815
When you add new music, photos, or videos to a Synology share, by default, the device will scan the new files, render some new thumbnails and index the file in the appropriate library if applicable. This indexing process is necessary for the files to be shown through the various media services such as Photo Station and Music Station. A common complaint from Synology users is that this indexing or thumbnail conversion process can get stuck.

Unfortunately, at the time of this writing, Synology has not implemented any kind of progress bar or anything to indicate whether the process really is frozen. Depending on the type of media being indexed, it may not in fact be frozen and there are perhaps more files to index than you are aware of.

Here I demonstrate the process to monitor the index progress to see if it is truly frozen, or simply to check the index progress out of curiosity.

Connecting Via SSH

This process assumes some familiarity with command-line tools like telnet. In Mac you merely need to open a terminal window, but in Windows you would have to third-party utility like PuTTY (because Microsoft’s Telnet solution does not support SSH protocol).

Update 08/2015: Windows 10 now includes SSH.

If, for whatever reason the Synology does not respond to the SSH request, make sure SSH is enabled by logging into the DiskStation Manager interface and navigating to Control Panel > Terminal & SNMP > Terminal.

ssh [username]@[synology IP]

At this point it may say something about an RSA key fingerprint (particularly if this is the first time you’ve ever connected via SSH) and ask if you’re sure you want to continue connecting. Just say yes. By default, the username and password should be the same as your admin account.

Ask (Query) The Database

psql mediaserver postgres

This will open a PSQL command prompt where you can perform what’s called a SQL query, which is basically a fancy way of saying you’re asking the database a question. SQL stands for Structured Query Language and is the standard language for database interaction.

SELECT COUNT(*) AS video_count FROM video;
SELECT COUNT(*) AS music_count FROM music;
SELECT COUNT(*) AS photo_count FROM photo;
SELECT COUNT(*) AS dir_count FROM directory;
SELECT * FROM music WHERE id = (SELECT MAX (id) FROM music);
SELECT * FROM photo WHERE id = (SELECT MAX (id) FROM photo);
SELECT * FROM video WHERE id = (SELECT MAX (id) FROM video);
SELECT * FROM directory WHERE id = (SELECT MAX (id) FROM directory);

The above query is actually 8 separate queries. For the first four it will answer with a table indicating how many photos, videos, songs, and folders have been indexed, followed by a comprehensive list of the most recently indexed file under each category, along with related tagging information (such as file name, format, length, etc). Generally, (at least in my experience) photos will be more numerous so will take the longest. So we can check the progress for just the photos like this:

SELECT COUNT(*) AS photo_count FROM photo;

Or if you simply wanted to see the name and location of the photo it most recently indexed, you could use this query:

SELECT path FROM photo WHERE id = (SELECT MAX (id) FROM photo);

Note that each query starts with a “SELECT” statement and each query ends with a semicolon (;). Capitalizing the different SQL statements is not necessary, just a force of habit.

Update February 22, 2016: As Sietse noted in the comment section, changes between DSM 5.2 and DSM 6 mean that by default, you can no longer login to the root account directly via SSH. Instead you must login as an admin user and escalate to root using the SUDO command. (e.g. sudo psql mediaserver postgres.

Update March 2, 2018: I hadn’t revisited this subject in some time now but I recently had a power outage that seems to have triggered some kind of full reindex of Photo Station.
I had uploaded a bunch of photos and music and nothing had shown up for a couple of hours, which indicated to me that the index was busy doing something else.

For reference, /var/spool/syno_indexing_queue is where all file changes are queued up for the indexer to process. Once the indexer triggers, it moves this file to sync_indexing_queue.tmp, so that’s the file to check when you want to see what it’s currently working on.

When I ran:

cat syno_indexing_queue.tmp

It showed:

#offset:128;                                                                                                                   
PhotoStation:1:R:photo

Something told DSM to run a full reindex of Photo Station. I’m not sure if it was a coincidence or if it really was the power outage — I’ve never got a straight answer about what exactly triggers a full index, though I’ve seen it more than once. The power outage seems less likely though, since it was shut down smoothly by my UPS controller.

In any case, it got my attention again.

The SQL queries I wrote about before are all well and good, but sometimes I just want a continuous poll of where it’s at, without having to manually run the command over and over. I could do some kind of cron job and output to an HTML file with an auto refresh but it comes up rarely enough that I just wanted a quick & dirty shell script to do it.

Long story short, here’s what I came up with:

while sleep 30; do ls -l /proc/$(pidof synomkthumbd)/fd | grep volume ; done

Basically what the above one-liner does is every 30 seconds it’ll poll the synomkthumbd process and find out what it’s working on and print the results to the console. A new line will output every 30 seconds until you exit the command. the grep volume section at the end just cleans up the output so that it only shows you the relevant information (assumes volume is in the response line as in volume1, volume2 etc).

The command may take a bit to show results because there are times when it’ll be between files so it won’t have any output. Just wait a minute or two and you should start to see results. Or alternatively you could shorten the polling period from 30 to something shorter.

Is your index frozen? Learn how to restart it.

Filed Under: Tips

Synology — How To Fix a Frozen Index Process

May 5, 2015 By Andrew McLean 35 Comments

DS1815
When you add new music, photos or videos to a Synology share, by default, the device will scan the new files, render some new thumbnails and index the file in the appropriate library if applicable. This indexing process is necessary for the files to be shown through the various media services such as Photo Station and Music Station. A common complaint from Synology users is that this indexing or thumbnail conversion process can get stuck.

Unfortunately, at the time of this writing, Synology has not implemented any kind of progress bar or anything to indicate whether the process really is frozen.

Here I’ll explain the simple process of restarting the frozen index and thumbnail conversion process. The downside of this is that it will start the indexing from the beginning, but any thumbnails generated up to the point of it being frozen will remain.

Connecting Via SSH

This process assumes some familiarity with command-line tools like telnet. In Mac you merely need to open a terminal window, but in Windows you would have to third-party utility like PuTTY (because Microsoft’s Telnet solution does not support SSH protocol).

If, for whatever reason the Synology does not respond to the SSH request, make sure SSH is enabled by logging into the DiskStation Manager interface and navigating to Control Panel > Terminal & SNMP > Terminal.

In DSM 6 for security reasons you must login as an admin user (not necessarily “admin”) and then run the commands as root by preceding commands with “sudo”

ssh admin@[synology IP]

At this point it may say something about an RSA key fingerprint (particularly if this is the first time you’ve ever connected via SSH) and ask if you’re sure you want to continue connecting. Just say yes. The first admin user you created when setting up the DiskStation and root will have the same password.

The Command

#change directory to the index spooler directory
cd /var/spool
#restart index service
sudo synoservicectl --restart synoindexd
exit

Update 09/16: Previously this article included a command to delete the two temporary files syno_indexing_queue and syno_indexing_queue.tmp, but this is should not be necessary unless the files themselves are corrupt somehow. The problem with deleting the queue files is that they feed the indexer the information it needs to know what to index, and if we delete those the index may be incomplete, with no way of knowing what it was going to index. If you do end up deleting them for whatever reason, the only sure way of getting a complete index would be to force a full re-index.

I’m not sure yet what triggers the synoindexd service, but on occasion it seems that for days it does nothing. It’s not until I reboot it that it seems to kickstart the indexing process again.

When you edit/add/delete files, they are automatically logged in the syno_indexing_queue file. When the indexing service is triggered, it renames it syno_indexing_queue.tmp while it processes it (which can take a while if it hasn’t been triggered in a long time). In the meantime while it’s processing the .tmp file, any subsequent changes will go to a new syno_indexing_queue file.

The bottom line is if you see this .tmp file, theoretically the indexer is already processing it. If you see a syno_indexing_queue file but no syno_indexing_queue.tmp, then the indexer hasn’t been triggered and can be triggered manually with the command above.

Is your Synology index really frozen or just taking a long time? Learn how to check.

Filed Under: Tips

Outlook 2011 and Office 365 Password Problem

December 28, 2014 By Andrew McLean Leave a Comment

Very recently some my clients began experiencing a troubling problem: while using Outlook 2011 on Mac OS X, they were constantly getting prompted for a password, stating that the old password was incorrect. Now, having experience with that kind of thing before, the first thing I checked was that their account was not getting locked out somehow (usually due to too many incorrect password attempts). But in this case, that was not the problem.

Next, I simply had them shut down Outlook completely and start it up again. Sometimes programs get unstable when left running for too long. It shouldn’t happen, but it does. And this is Microsoft software on a Mac so it seems par for the course. But still the problem continued.

Then I checked the Keychain, which is a utility on the Mac that stores authentication for different programs in a central place. I checked it for errors, fixed the ones it found, and when even that didn’t work, I wiped out the old entries and created new ones. Still the problem continued.

Eventually while digging in Google, I came across the solution.

For some unexplainable reason (or at least not any reason Microsoft has made public), instead of the usual user@domain.com username format, Outlook 2011 requires the following:

yourdomain.onmicrosoft.com\username@yourdomain.com

So for example, let’s say your domain is contoso.com and your username was alfred. In that case, when setting up your account settings, you would input this in the username field:

contoso.onmicrosoft.com\alfred@contoso.com

For my client, it had worked before fairly consistently with the old user@domain.com-style username, but after an update or when upgrading to OS X 10.10 Yosemite, or some other mysterious combination of circumstances, this issue appeared.

I hope this helps others — I really had to dig to find this gem.

Filed Under: Tips

  • « Previous Page
  • 1
  • 2

Contact Us

McLean IT Consulting Inc.
Serving Greater Victoria

P: 250-412-5050
E: info@mcleanit.ca
C: 250-514-2639

Featured Article

McLean IT 2.0

It's been a slow branding process but I've managed to *mostly* transition all of my supplier accounts, marketing materials, et cetera to the new … Continue Reading

Blog Categories

Our Mission

We seek to enrich and improve small and medium businesses by delivering best-in-class technology solutions, and offering a premier customer service experience. Contact Us Now!

Quick Menu

  • About
  • Testimonials
  • Contact
  • Blog
  • Sitemap

Let’s Get Social

  • Email
  • Facebook
  • LinkedIn
  • Twitter
  • YouTube

Copyright © 2025